This chapter contains the following topics:
The Items selection is used to maintain and print information on items in inventory, print item labels, and obtain a log (audit trail) of changes.
If you have more than one warehouse, descriptive information about each item is entered only once whereas stocking information is entered separately for each warehouse at which you choose to stock that item.
This chapter assumes the more general case of multi-warehousing, but the absence of a warehouse code is the only difference that single warehouse users will notice.
Information on each item in your inventory is kept in Items. This chapter describes the fields in items, tells how to enter them, and shows how to print item lists.
Select
Items from the I/C menu.
Graphical Mode
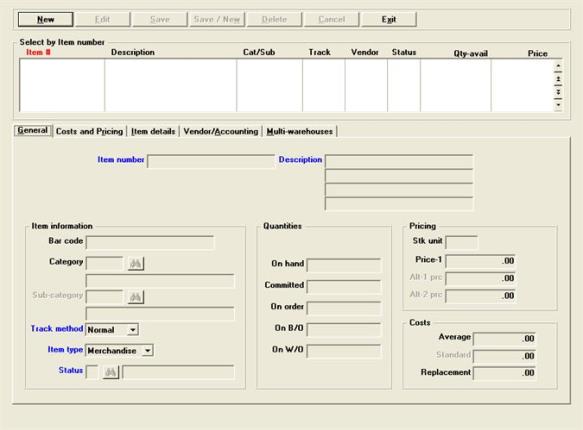
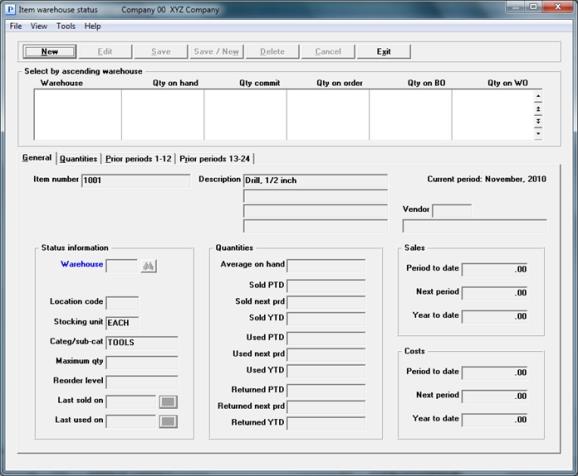
The following screen displays:
From this screen you can enter new items or edit existing items.
The list box displays up to 6 items at a time. You may sort the items by item number, item name, category, and vendor number all in ascending or descending order. Only column names in red may be sorted. To change the sort direction or field either click on the column name or the arrow to the right of the column name or use the View menu options.
To locate an item, start typing a number or name, depending on which sort field is selected. You may also use the up/down arrows, Page up, Page down, Home and End keys to locate an item.
Items that display in the list box are available for changes or deletion. The fields for the selected item display in the lower part of the screen.
When an item is found, you may select the <Enter> key or Edit button to start editing.
Items Buttons
The buttons at the top of the screen do the following:
| Button | Keyboard | Description |
|
New |
Alt+n |
For adding a new item |
|
Edit |
Alt+e |
For editing an existing item |
|
Save |
Alt+s |
For saving a new item or changes to an existing item |
|
Save/New |
Alt+w |
This button combines the Save and New buttons by first saving the item and then starting a new item |
|
Cancel |
Alt+c |
To cancel the editing or adding of an item |
|
Exit |
Alt+x |
To exit the screen. Exit works like cancel when you are adding or editing an item |
Options
After you have selected an existing item, you have these options:
| Function | Description |
|
Down arrow or <F1> |
For next |
|
Up arrow or <SF1> |
For previous |
|
Delete button, <Alt+d> or <F3> |
To delete. See Deleting Items |
|
Select Options > Alternate items or <F5> |
To enter alternate items. See Entering Alternate Items |
|
Select Options > Item notes or <F6> |
To enter or change item notes. See Entering Item Notes |
|
Select Options > Item Status entry or <F7> |
To enter or change status information. See Entering Status Records |
|
Click on the Multi-warehouses tab or <SF7> |
To view multi-warehouse information. See View Warehouses Tab |
Character Mode
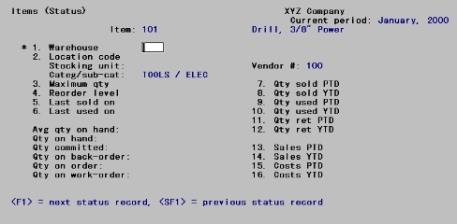
The following screen displays:
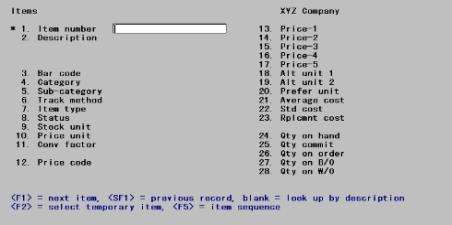
Enter the following information:
This field is used to maintain item numbers.
Options
Enter a new or existing item number, or use one of the following: options:
|
<F1> |
For the next item |
|
<SF1> |
For the previous item |
|
<F2> |
For a list of temporary items entered in O/E Orders. See Temporary Item Conversion |
|
<F5> |
For item sequence |
|
<Enter> |
To look by description |
On an existing item, an ampersand (&) displays immediately to the left of the word Item in this field if there is at least one note for this item. Notes may be viewed from the Field number to change ? prompt by pressing <F6>.
|
Format |
Up to 15 characters |
|
Example |
Type 101 |
For an existing item, you may also enter (or scan) the item bar code.
|
Format |
Up to 20 characters |
An item number that starts with an asterisk (*) signifies a miscellaneous item. A miscellaneous item is one for which no quantities are tracked, and whose description and price are not considered permanent.
Miscellaneous items allow you to set up catch-all inventory items to represent a variety of different items for which you do not wish to create separate item records. For example, a miscellaneous item could be used to track such things as service charges.
Miscellaneous items are non-inventory items and cannot be processed through the Inventory selection. Miscellaneous items may be sold through Accounts Receivable (A/R), Order Entry (O/E) and Point of Sale (P/S). When entering a miscellaneous item in these modules, you can enter its description and price. Quantities on hand are not monitored by the system for miscellaneous items.
You may wish to create miscellaneous item records in Items for broad categories of items that have the same taxable status, sales account, etc., as well as miscellaneous items to be used in kit definitions to represent overhead costs.
When Miscellaneous items are used costs are used to generate the appropriate GL transactions. Thus posting a sale of these items is financial ONLY – no updates to inventory (quantity) are done.
Miscellaneous Items must have an inventory account that has an Inventory type code of C. See Entering Inventory Accounts in the Inventory Accounts chapter for details on how the distribution transactions for Miscellaneous items differ from that of regular inventory.
Entering existing items
Options
After you have selected an existing item, you have these character mode options:
| Function | Description |
|
<F1> |
For next |
|
<SF1> |
For previous |
|
<F3> |
To delete. See Deleting Items |
|
<F5> |
To enter alternate items. See Entering Alternate Items |
|
<F6> |
To enter or change item notes. See Entering Item Notes |
|
<F7> |
To enter or change status information. See Entering Status Records |
|
<SF7> |
To view multi-warehouse information. See View Warehouses Tab |
After an O/E order with a temporary item is entered and before the order is printed, while in I/C Items you should convert any temporary item into an active item.
Conversion is not mandatory, but if don't convert you will not be able to track in I/C the items sold.
Do this by adding a new item and when on the item number field select the <F2> function key. A list of the temporary items entered in O/E displays. Once you have found the correct item, select OK to continue or Cancel to exit.
After selecting OK you will be on a blank Item number field. Enter a new item number. You may change the description as well. Enter the remaining item fields as needed. Set up a status to match the warehouse used in O/E.
Saving the new item will update the item number and description on the order.
An item can be deleted when status information (explained later in this chapter) exists for it, if the status records contain no quantities on-hand, committed, on-order, on backorder, or on work orders.
Inventory history is retained for an item after you delete it. History for a deleted item will not print on the Inventory History report and cannot be viewed through View > Inventory history. If you do not want to retain history for a deleted item, purge the history before you delete the item. See Purge Inventory History. Purging history removes it without a record. You may want to print the Inventory History report for the history you are about to purge before you run the purge.
If you select to delete an item, you are asked to confirm the deletion if status records exist.
Enter the item description.
|
Format |
Four lines of 25 characters each |
|
Example |
Type: Drill, 3/8” Power |
Bar codes are an alternate method to identify an item throughout Inventory control, Order Entry, and Purchase Order. A bar code can be entered instead of the item number to lookup a particular item.
Options
Enter the bar code for the item, or use one of the options:
|
<F2> |
To enter up to 8 different bar codes for the items |
|
<Enter> |
To leave this field blank |
|
Format |
Up to 20 characters or use the options |
|
Example |
Press <Enter> |
A bar code may be entered from the keyboard, or it may be scanned by using a bar code reader. If one or more bar codes are entered, each must be different from any other bar code or item number already entered.
Sub-category
Enter codes of your choice that identify the category and sub-category of this inventory item.
Entering a category and sub-category are optional, but each must exist in categories or sub-categories. You may review the entry of Categories and Sub-categories in the Master information chapter.
An item can be searched for by its category/sub-category or sub-category in the View (Items) if you selected in Control information to use the category/sub-category or sub-category keyword methods.
|
Format |
Up to 5 character |
|
Example |
Type: Tools |
The category/sub-category classifications are used as sorting and selection parameters for various item-related reports in Inventory, Sales Analysis and Point of Sale. For example, a report could be printed for only Drills used in Plumbing by assigning a category of DRILL and a sub-category of PLUMB.
We suggest reviewing your inventory items prior to data entry to determine groupings that may be used to standardize the categories and sub-categories. You may wish to specify the item’s department as its category.
Sub-category
|
Format |
Five characters |
|
Example |
Type: Elec |
Enter a code to specify the method of tracking this item.
|
Code |
Description |
|
Normal |
For normal tracking. |
|
Serial |
For always serialized tracking. |
|
Lot detail |
For lot detail tracking |
|
Warranty |
For warranty tracking |
|
Format |
Drop down list. Select from the table above. The default is Normal. |
|
Example |
Press <Enter> to accept the default. |
The tracking method of an item is used in Inventory control, Order Entry, Point of Sale and Purchase Order.
If Normal is selected, normal tracking is performed for the item, and no serial numbers or lot numbers are requested for this item during any function. You may press <Enter> to default to Normal.
Normal is the only valid entry for miscellaneous items (those whose item number begins with an asterisk), or if you specified in Control information that back order control is not used.
If Serial is selected, a serial number must be entered for this item when entering inventory transactions, and when orders are processed in O/E and P/S and receivings in P/O.
If Lot detail is selected, a lot number must be entered for this item during entry of inventory transactions and purchase orders. Select Lot detail to track lot balances and the detail of every transaction processed for this item’s lots.
If Warranty is selected, normal tracking is performed. These types of items are actual warranties that have been purchased from the manufacturer of the item. This can also be an internal warranty item.
The tracking method for an item may be changed only if the item has no quantity on hand, quantity committed, quantity on order, quantity on back order, or quantity on work orders. In addition, for a serialized item, the tracking method cannot be changed if serial numbers exist or if components are tracked. For a lot-controlled item, the tracking method cannot be changed if lot numbers exist.
Merchandise items you receive and sell. Kits are items that you build from others items. Sub-assembly type items are for future use.
Options
Select from one of the following:
|
Merchandise |
|
Sub-assembly |
|
Kit |
|
Format |
Select one of the above from a drop down list |
|
Example |
Select Merchandise |
This is a mandatory field. Status must be entered prior to entry here. This field is used as selection criteria for the I/C Reports.
You may review the entry of Status Codes in the Master Information chapter.
Quantities
On hand
An entry in this field is not allowed. The field is updated during the posting of inventory transactions.
If necessary, this field can be corrected using the Recalculate inventory quantities selection on the Data recovery utilities menu.
Committed
An entry in this field is not allowed. The quantity committed is updated automatically when inventory transactions are entered and posted in I/C, when orders are entered in O/E, when invoices are entered in A/R, and when receivings are posted in P/O.
If you enter a backorder code of X in the B/O code field (number 43 on the character mode screen), quantity committed for this item is not tracked.
If necessary, this field can be corrected using the Recalculate inventory quantities selection on the I/C Data Recovery Utilities menu.
On order
If you have specified in Control information that you are using Purchase Order, the quantity that your company has on order from your vendor displays in this field.
No entry is allowed, as this field is automatically updated when you run the Purchase Order module.
In character mode, if you are not using Purchase Order, (Not applicable) displays.
If necessary, this field can be corrected using the Recalculate inventory quantities selection on the I/C Data Recovery Utilities menu.
On B/O
This field displays the quantity of this item that your customers have ordered that is on backorder. The quantity on back order field is shown if you specify in the B/O code field to keep track of backorders for this item.
This field is automatically updated when an O/E order or P/S transaction is posted, assuming the above conditions are met.
If necessary, this field can be corrected using the Recalculate inventory quantities selection on the I./C Data Recovery Utilities menu.
On W/O
In character mode, if you do not use kits, (Not applicable) displays for this field.
This field shows the quantity of this item currently being assembled on work orders. This quantity is increased when work orders are issued using Issue work orders and decreased when work orders are completed using Close work orders.
If necessary, this field can be corrected using the Recalculate inventory quantities selection on the Data recovery utilities menu. For more information on running this utility see the Additional I/C Utilities appendix.
The second tab appears like the following:
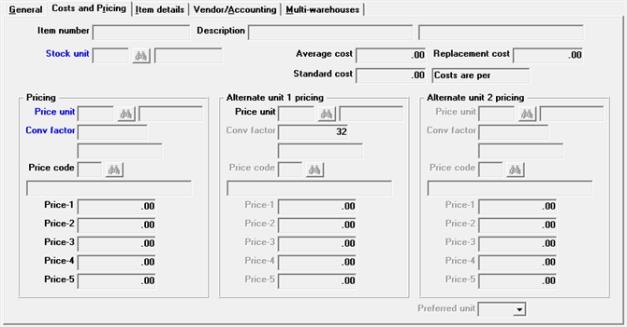
Stocking unit, pricing unit, and conversion factor (described below) are used in O/E, P/S and A/R for price calculation. However, no conversion between stocking and pricing units is done in I/C.
When you are using I/C without Accounts Receivable the stocking unit and pricing unit you enter should be the same, with a conversion factor of 1.
|
Format |
One character |
|
Example |
Type A |
Enter the unit of measure in which you stock this item. An item may be stocked and sold in units of EACH, BOX, CASE, etc. Each item is stocked in only one stocking unit. The stocking unit is normally the same as the selling unit.
Enter the stocking unit or press <F2> to use a stocking unit of Each.
|
Format |
Up to 4 characters, or press <F2>. |
|
Example |
Press <F2> |
You may review the entry of Units in the Master Information chapter.
An entry is allowed in this field for non-miscellaneous items only when initially adding the item, or if Average cost and Qty on hand are currently zero. This field is automatically updated when posting inventory transactions.
If you need to change the average cost, enter and post a series of adjustment transactions, so that the appropriate distributions to G/L are made. Refer to the Inventory Transactions chapter for details.
The average cost is the cost per stocking unit.
|
Format |
999999.99999 |
When you select LIFO, FIFO, or average as the inventory valuation method in Control information, this field cannot be entered.
If standard is the inventory valuation method, enter the standard cost. The standard cost is the cost you have set as standard for one stocking unit of the item being entered. The cost set by you in Items is not updated by the system. Later, if the actual cost of the item varies from the standard cost, the variance (difference) will be reported separately.
|
Note |
Standard costing is illustrated in the Standard Cost Valuation appendix. If you wish to use standard costing throughout the exercises, make up a standard cost for each item. |
|
Format |
999999.99999 |
Enter the replacement cost of the item. Replacement cost is the cost of a stocking unit of an item at the last purchase. It is updated automatically when a receiving is entered.
Replacement cost is used as a default cost for miscellaneous items.
|
Format |
999999.99999 |
|
Example |
Press <Enter>. |
Enter the pricing unit or press <F2> to use the stocking unit as the pricing unit.
|
Format |
Up to four characters |
|
Example |
Press <F2> |
On certain items, the unit of measure on which pricing is based may be different from the stocking unit. The pricing unit entered in this field allows you to record this different unit of measure.
For example, paper is often stocked and sold by the ream, but priced per 1000 sheets. Its stocking unit would be REAM and its pricing unit would be MSHT.
If you enter a pricing unit that is different from the stocking unit, you will enter the conversion factor in the next field.
Enter the number of stocking units in each pricing unit.
The entry for the conversion factor depends upon the relationship between the stocking unit and pricing unit.
| 1. | Stocking unit is smaller than the pricing unit. For example, if an item is stocked by the dozen and priced by the gross, the conversion factor would be 12. There are 12 dozen (stocking unit) in one gross (pricing unit). |
| 2. | Stocking unit is larger than the pricing unit. For example, if an item is stocked by the box (8 each in a box) and priced by EACH, the conversion factor would be 0.125. There is 1/8 of a stocking unit in a pricing unit. |
|
Note |
Note that the conversion factor is used only for the purpose of price calculation, and only within Accounts Receivable and Order Entry. |
|
Format |
999,999.99999 |
Enter the price code that will be used to determine the price and discount (or markup) structure for this inventory item, or press <Enter> to skip this field.
The price code entered here is used by Accounts Receivable, Order Entry and Point of Sale in conjunction with the prices (or costs) for the item.
For codes with a price type of 3 (discount price basis by quantity ordered within customer type) or 6 (mark up price basis by quantity ordered within customer type), a generalized description will display rather than one you entered, as there can be several customer types associated with each type-3 and type-6 price code.
See the Price Codes chapter.
|
Format |
Up to two characters |
|
Example |
Press <Enter>. |
Enter price-1, the first of up to three prices that customers can be charged for a pricing unit of this inventory item. Normally, this would be the list price of this item.
Price-1 is normally the highest price charged for the item. It is the highest price that can be entered within the group of five prices.
|
Format |
9,999,999.99999 |
|
Example |
Type: 65.00 |
Enter price-2 for this inventory item. It must be less than Price-1.
|
Format |
9,999,999.99999 |
|
Example |
Type: 62.00 |
Enter price-3 for this inventory item. It must be less than Price-2.
|
Format |
9,999,999.99999 |
|
Example |
Type: 61.50 |
Enter price-4 for this inventory item. It must be less than Price-3.
|
Format |
9,999,999.99999 |
|
Example |
Press <Enter> |
Enter price-5 for this inventory item. It must be less than Price-4.
|
Format |
9,999,999.99999 |
|
Example |
Press <Enter> |
Price-5 is normally the lowest price charged for the item.
Alternate unit 1 pricing
Alternate unit 2 pricing
Entry is not allowed in the alternate unit pricing fields for items with a tracking method of serialized.
If this item can be sold or received in units other than the stocking unit, enter up to two alternate units for this item. You can press <Enter> at Alt unit 1 to skip these fields if the item can be sold only by the stocking unit, as shown in the following screen:
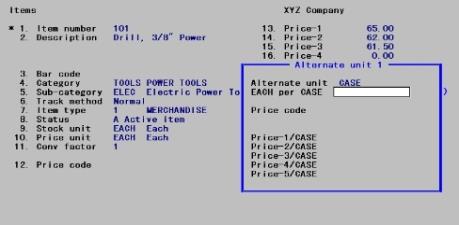
For example, an item that is normally stocked and sold as EACH might also be sold as a CASE.
If you enter an alternate unit for field number 18 or 19, a window displays for you to enter additional information about the unit.
|
Format |
Up to four characters, or press <Enter> for None at both fields. |
The unit of measure is displayed. Changes to the unit can be made when Any change ? appears. Enter spaces for this field to delete an alternate unit.
|
Format |
Up to four 4 characters |
Enter the number of stocking units in each alternate unit.
|
Note |
If the number of stocking units per alternate unit includes decimals, rounding errors will accumulate in this item’s Qty-on-hand. To avoid any rounding error, enter only whole numbers in this field. |
|
Format |
999,999.99999 |
Enter the price code that will be used to determine the price and discount (or markup) structure when selling this unit of the item, or press <Enter> to skip this field.
|
Format |
Up to two characters |
Price-1, Price-2, Price-3, Price-4, or Price-5
Enter up to five prices that customers can be charged for this item when sold in this unit. Price-1 must be the highest price and Price-5 the lowest.
The prices entered here are per alternate unit. If a pricing unit has been entered that is different than the stocking unit, the prices entered here are per pricing unit.
For example, the item “Eggs” may have a stocking unit of EACH and a pricing unit of DOZ, with a conversion factor of 12. If your alternate unit is TRAY, with 24 EACH per TRAY, and you enter $0.80 in this field, this is the price per DOZ when sold in this alternate unit. When a TRAY of “Eggs” is sold in A/R or O/E, its price would be $1.60.
After the information is entered for each alternate unit, field numbers 18 and 19 change to show Price-1 for the unit.
|
Format |
9,999,999.99999 for each price |
For this example, skip the alternate pricing fields.
If you entered at least one alternate unit, enter your preferred selling unit for this item. Enter one of the alternate units, or press <Enter> to default to the stocking unit.
The preferred unit is used as the default selling unit for this item during the Order Entry (Enter) selection. A different selling unit may be selected during order entry.
If this item has no alternate units, this field cannot be entered.
|
Format |
Up to four characters |
Graphical Mode
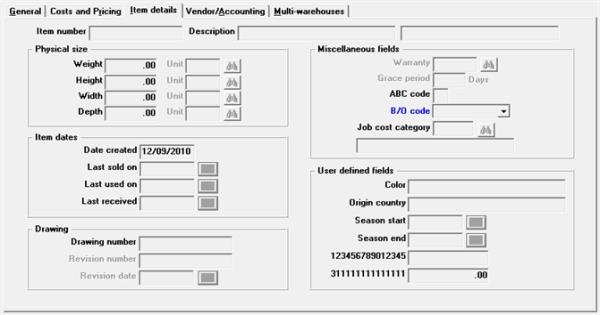
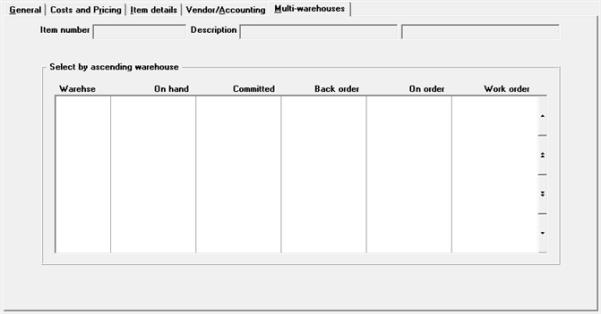
The third tab looks similar to the following:
Character Mode
After you press <Enter> at Field number to change ?, a second screen displays:
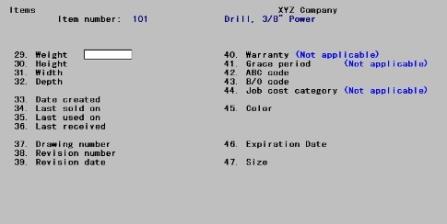
Physical size
This field allows entry of the weight of the item. Weight information can be printed on invoices from Order Entry.
|
Format |
99999.99 (for the weight) and four characters (unit) |
|
Example |
Type 3.5 and press <Enter>. |
This field allows entry of the height of the item
|
Format |
999999.999 (height) and four characters (unit) |
|
Example |
Press <Enter>. |
This field allows entry of the width of the item.
|
Format |
99999.999 (width) and four characters (unit) |
|
Example |
Press <Enter>. |
This field allows entry of the weight of the item.
|
Format |
99999.999 (depth) and four characters (unit) |
|
Example |
Press <Enter>. |
Item dates
This date is automatically updated by the system.
This date is automatically updated by the system.
This date is automatically updated by the system.
This date is automatically updated by the system.
Drawing
This field allows you to associate a drawing number with the item. This is an optional field that could be used to identify a diagram, mechanical drawing, CAD number, specification, etc. for the inventory item.
|
Format |
15 characters |
|
Example |
Press <Enter>. |
This field allows you to enter a revision number for the drawing.
|
Format |
15 characters |
|
Example |
(Not applicable) displays |
This field allows you to enter a revision date for the drawing.
|
Format |
MMDDYY |
|
Example |
(Not applicable) displays |
Miscellaneous fields
This field is only applicable for serialized and warranty items. This is the warranty program that is associated with the item. Warranty programs must already be defined under warranty programs before you can enter the information. This is a mandatory field for these types of items, therefore if you do not have a warranty for these items, make sure to use the None warranty program you defined under warranty programs.
|
Note |
If you change from Non-Serialized Inventory to Serialized Inventory, make sure to enter the warranty information after you change the track method. |
This field may only be entered for items with a item tracking method of Warranty. See Track method.
This is the amount of time from your purchase of a product, until you sell the product that you have as a grace period for the associated warranty from the manufacturer.
This code is used by the Reports (ABC analysis) selection in I/C. For an explanation of what the ABC code is, see Selecting ABC Analysis Reports.
You can enter one character (A, B, or C), but you don't have to enter it because it can be automatically set when you run ABC analysis. You can skip this field by pressing <Enter>.
|
Format |
One letter (A, B, or C), or press <Enter> to skip this field. |
|
Example |
Press <Enter>. |
Enter a code to indicate whether this item can be back ordered for customers, and whether committed quantities are tracked for this item.
Select OK to B/O if the item may be backordered, and quantity committed is tracked.
Select not OK to B/O to designate that the item may not be backordered. If an attempt is made to backorder this item, a warning displays, but it can be overridden.
Select no B/O control if the item cannot be backordered, and quantity committed is not tracked. If no B/O control is selected here, no committed quantities will be tracked for the item in O/E, P/S and I/C.
Enter OK to B/O to indicate that it is acceptable to back order the item (in O/E and P/S), or not OK to B/O to indicate that it is not acceptable to back order the item. Regardless of your entry, you will still be able to back order or not backorder the item in O/E and P/S. Your entry here should be such that normal conditions are accommodated.
If no B/O control is selected, no attempt is made to determine whether there is sufficient stock of the item to meet an order. Thus, the entire quantity ordered is assumed to be the quantity to ship.
no B/O control is a valid entry for an item with the field Track method settings of normal and warranty. It is also the only allowable entry for miscellaneous items (those items where the item number begins with *). no B/O controlis the only valid entry for an item if you specified in I/C Control information that there is to be no backorder control.
Options
Select one of the following options:
|
OK to B/O |
For backordered, and quantity committed to be tracked. |
|
no B/O control |
If the item can be backordered, and quantity committed is tracked, but the system will warn you if it is not typical to backorder this item. |
|
not OK to B/O |
If the item may not be backordered, and quantity committed is not tracked. |
|
Format |
Drop down list, one selection from the table above |
|
Example |
Select OK to B/O, then press <Enter> |
If you are using Job cost, you can define the default cost category.
If you have defined user defined fields in I/C Control Information, they may be entered next. If you have not, then you will move on to the next tab.
|
Note |
If you have added user-defined fields in I/C Control information, the field numbers in character mode will differ from the field numbers on the screen shot. See User defined fields in I/C Control information. |
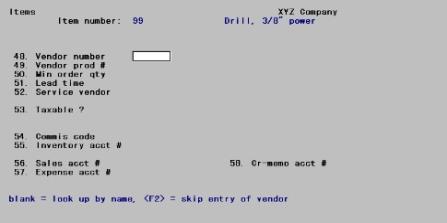
The vendor/accounting tab is similar to this:
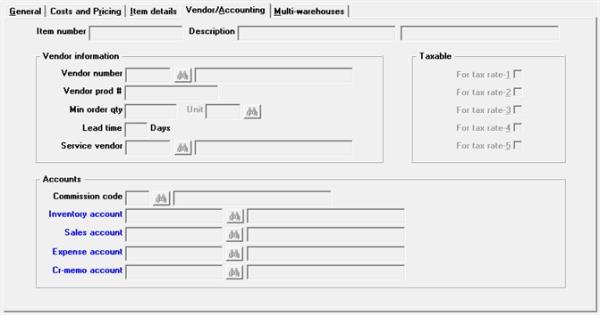
You can use the fields on this tab to enter information about the vendor for this item. The vendor information is shown on the Purchasing Advice report.
If you plan to add Purchase Order later, you should enter this vendor information now. If you will be using vendor items in P/O, this information appears as defaults when setting up the vendor item records.
The accounting numbers must be entered for every item.
Vendor information
Enter the vendor number of the current primary vendor.
If you are using Accounts Payable, the number is verified against Vendors. If Accounts Payable is not used, then any number can be entered.
Options
You may use one of the options:
|
<F2> |
To skip entry of a vendor and proceed |
|
<Enter> |
To look up the vendor by name in Vendors if Accounts Payable is installed |
If you are using A/P and press <F2> to skip entry of a vendor; the Vendor prod #, Min order qty, and Lead time fields are also skipped.
|
Format |
Up to six characters or use the option. |
|
Example |
Type: 100 |
Enter the vendor’s specific product number. This is the number that the vendor uses to identify this product.
An item can be searched for by vendor number/vendor product number or vendor product number in the View (Items) and P/O Purchase order (Enter) selections, if you selected in Control information to use these keyword methods.
|
Format |
Up to 15 digits |
|
Example |
Type: 38001 |
Enter the minimum order quantity the vendor will accept for this item.
|
Format |
999999.999 |
|
Example |
Type: 12 |
This field cannot be entered if you left the min order qty field blank.
If you entered a Min order qty, then enter the unit in which the vendor sells this item (CASE, LITR, DOZ, EACH, etc.).
Enter the usual time (in days) that the vendor requires to fill your order for this item. If you are not sure how long the lead time is, press <Enter>.
The lead time will appear on the Purchasing Advice Report.
|
Format |
Up to three digits |
|
Example |
Press <Enter>. |
Enter the vendor number of the service vendor for this item.
|
Format |
six characters |
|
Example |
Press <Enter>. |
Taxable
Leave the boxes unchecked or select the <Space bar> to check the boxes.
The taxable status of the item determines whether the price for this item is included in the taxable amount of the order or invoice in O/E, P/S or A/R.
A checked box means the item is taxable when the customer is taxable. An unchecked box means the item is not taxable, regardless of the customer’s tax status.
If you are using A/R, with multiple tax levels per tax code, you will need to determine if this item is taxable at one or more tax levels.
|
Format |
Check box with checked being yes and unchecked is no. The default is unchecked. |
|
Example |
Press <Enter> to accept the default. |
Enter the commission code that will be used to calculate the sales rep’s commission on a sale of this item, or press <Enter> to skip this field. This code takes precedence over all other commission information in the A/R Control information.
|
Note |
If you entered a category for this item, the Inventory account through Cr-memo account fields (#52 through #55 in character mode) default to the accounts entered for the category. See Categories and Sub-categories in the Master information chapter. If you are not assigning cost centers to items, per I/C the Control informationAssign cost centers (or sub-accounts) to items field, the cost center is still being pulled in from the Category entered on the item. If you change Control information to assign cost centers/(sub accounts) per item, then you should review the accounts entered for items. |
Enter the inventory account for this item.
Options
Use one of the following:
|
<F1> |
1200-000 Merchandise inventory |
|
<F2> |
To scan through valid inventory accounts |
Receivings for this item will debit this account, and sales of this item will credit it. If you are using average cost valuation, see the summary in the chapter titled Inventory Under Average Cost regarding postings to inventory accounts. If you are using LIFO or FIFO cost valuation, see the distributions summary in the LIFO/FIFO Cost Valuation appendix. If you are using standard cost valuation, see the distributions summary in the Standard Cost Valuation appendix.
|
Note |
Miscellaneous items (item number beginning with *) must be assigned inventory accounts of type C (Miscellaneous costs applied). Refer to the Inventory Accounts chapter. |
|
Format |
This varies and is based on Account structure. |
|
Example |
Press <F2> for the default account. |
If you wish to change the inventory account for an item, refer to Changing Inventory Accounts section later in this chapter.
Enter the main account number for this item’s sales account, or press <F2> for the default account.
This main account is used by Order entry, Accounts Receivable and Point of Sale when posting sales distributions for this item.
When not using sub accounts or cost enters as determined by the Assign cost centers (or sub-accounts) to items field in I/C Control information, when you enter a sales account, but the sales sub account is different that what is entered in Default cost center (or sub-account) field, then you will not be able to enter the account.
See the description of Default sales account in the chapter titled Control Information that explains how the main account entered here is combined with a Cost Center during posting (if you are using Cost Centers) in order to obtain an actual G/L account to credit for the sale of the item.
If you entered a Category for this item, then account comes from the Category.
|
Format |
This varies and is based on Account structure. |
|
Example |
Press <F2> for the default account. |
Enter the main account number for this item’s expense, or cost of goods sold account.
This main account is used by Inventory control, Order entry, Accounts Receivable and Point of Sale when posting the cost of sales for this item.
See Default expense account in the Control Information chapter. This explains how the main account entered here is combined with a Cost Center during posting (if you are using Cost Centers) in order to obtain an actual G/L account to debit for the cost of goods sold.
If you entered a Category for this item, then account comes from the Category.
|
Format |
Varies and is based on Account structure. |
|
Example |
Press <F2> for the default account. |
Enter the account number for returns of this item.
Options
Use the following:
|
<Enter> |
For the default credit memo account number in the I/C Control information. If you entered a Category for this item, then account comes from the Category. |
This account is used by Inventory control, Order entry, Accounts Receivable and Point of Sale when posting credit memos (returned goods) for this item.
Refer to Default credit memo account in the Control Information chapter. This explains how the main account entered here is combined with a Cost Center during posting (if you are using Cost Centers) in order to obtain an actual G/L account to credit for the returned goods.
This tab provides a view of item quantities per warehouse. Quantities include on-hand, committed, back ordered, on order and work ordered.
Graphical Mode
To access the tab click on it or select <SF7>.
Character Mode
To access the multi-warehouse window select <SF7>.
Here is an example of a multi-warehouse window that has three warehouses:
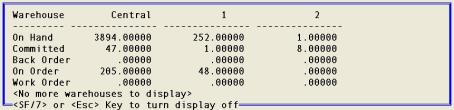
Options
The options while in this window include:
|
<SF7> |
To exit the window and return to the item |
|
<Esc> |
To escape the window and enter a new item |
There are three optional functions that you may enter following the entering of the primary fields for an item. There are warehouse statuses, item notes and alternate items. All three of these can be entered immediately or later.
Keep in mind that you cannot track stocked item quantities until a warehouse status record has been entered.
Graphical Mode
When entering a new item the following window displays:
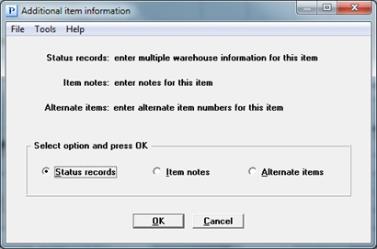
Choice one of the radio buttons using the left or right arrow keys or click on a choice with your mouse. You may access more information about each of the three choices through these links:
Select OK to accept your radio button choice or select Cancel to return to the item entry screen. If you select Cancel you may select any of these choices from the Options menu at a later time. You cannot recieve any inventory until you have entered a status record for that item.
Character Mode
If you are entering a new item, in the middle of the last screen the following window displays:
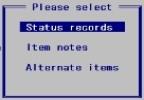
All three choices are documented in detail below:
Status information must be entered for each item that you define. If you are using multi-warehousing, status information must be set up for each warehouse in which the item is stocked.
You may use this selection to enter status information, or you may use the Status or Status load described in the Status and Status Load chapters.
Graphical Mode
After you have select Status from the selection window, <F7> from Items (Enter) or select Item status entry from the Options menu a window similar to this displays:
Select the New button to add a status record. Select Edit to change and existing record.
Character Mode
If you choose Status records from the selection window it looks similar to this:
Enter the information as follows:
If you are not using multiple warehouses as defined in I/C Control information, then this field cannot be entered and will default to Central.
Enter the code for the warehouse for which you want to enter the item’s status information. You must have previously defined the warehouse code using Warehouses.
Options
Enter a warehouse code or use one of the options:
|
<F1> |
For the next status record |
|
<SF1> |
For the previous status record |
|
Format |
Up to two digits or use the option. |
|
Example |
Press <F1>. |
Enter a bin or floor location code where items are stored.
When picking tickets are printed in Order Entry or when a Physical Count Worksheet is printed, items are listed in order by their location code to help physically locate them.
The location code is alphanumeric, so it may be letters, numerals, or a mixture of both. Alphanumeric characters are handled differently by the program than purely numeric numbers. For example, the alphanumeric characters “12^^” (where ^^ represents 2 spaces) is not the same as the number 12. Also, the value “9^^^” (with 3 spaces) is greater than the value “12^^” (with 2 spaces).
If you intend to use only numbers for location codes, and you wish them to appear in ascending order on the picking tickets, you must enter leading zeros in the Location code field. Enter the number 9 as “0009” and 12 as “0012”. In this way, items will always appear in the desired order on the picking tickets.
Enter the location code.
|
Format |
Up to four alphanumeric characters |
|
Example |
Type A1 |
Quantities for This Warehouse:
All quantities entered or displayed on this screen are for this warehouse only.
Enter the maximum quantity that you have decided should be on hand for this item.
|
Note |
A quantity called Average quantity on hand is calculated by the software and used in the Inventory Turnover Report. The software restricts this average quantity to be no more than the maximum quantity and no less than the reorder level (next field). See the Inventory Turnover chapter. |
If you use the Inventory Turnover Report, you should enter a value in this field and in Reorder level field to ensure that useful information is shown on the report.
|
Format |
99999999.99999 |
|
Example |
Type: 10000 |
Enter the quantity at which the item should be reordered, to be used for the Stock Status and Purchasing Advice reports.
|
Format |
99999999.99999 |
|
Example |
Type: 25 |
Enter the most recent date on which this item was sold. It is automatically updated when an inventory sale transaction is posted.
|
Format |
MMDDYY |
|
Example |
Press <Enter> |
If you are not using either kits or Job Cost, this field cannot be entered.
Enter the date of the last usage of this item in a work order or on a job (as opposed to a sale).
This field is updated when a job usage transaction (from Job Cost) or component usage transaction is posted using Inventory.
|
Format |
MMDDYY |
|
Example |
Press <Enter> |
Quantities
Average on hand
This is a display only field. This quantity is calculated when you run Close a period, and represents a running weighted average of the quantity on hand each period. See Weighted AverageRegarding inventory, weighted average measures the total cost of items in inventory that are available for sale divided by the total number of units available for sale. Typically this average is computed at the end of an accounting period. Suppose you purchase five widgets at $10 apiece and five widgets at $20 apiece. You sell five units of product. The weighted average method is calculated as follows: Total Cost of Goods for Sale at Cost (divided) Total Number of Units Available for Sale = Weighted Average Cost per Widget Example: Five widgets at $10 each = $50 Five widgets at $20 each = $100 Total number of widgets = 10 Weighted Average = $150 / 10 = $15 $15 is the weighted average cost of the 10 widgets. Refer to the information in field Maximum qty above regarding Average quantity on hand.
Qty on hand
Qty committed
Qty on back-order
Qty on order
Qty on work-order
No entry is allowed in these fields. Their meaning is the same as on the first Items screen, except that the quantities shown are for this warehouse.
Period to date, Next period and Year to date Fields
When a transaction (sale, credit memo, job usage, or assembly) is posted, the following PTD and YTD fields are updated if the transaction date is on or earlier than the period ending date. (The period ending date was entered in Control information.) If the transaction date is beyond the period ending date, then it is update in the Next period field.
For an existing status record, you would ordinarily not want to change the PTD and YTD fields because they are automatically updated by other selections. If you try to change these fields, a message informs you that a change is not allowed.
However, if Allow protected changes is checked (yes) in Company information, you may override this restriction. Refer to the Overriding Protected Changes in the System User documentation for information on how to do this.
For a new item, you can press <F2> at field # 7 to set all remaining fields to zero. Otherwise, you can enter information in each field as described below:
Sold next prd
Sold YTD
Enter the quantity of the item sold to date in the current period and year.
The quantity in each field is increased when a sale is posted, and decreased when a credit memo is posted. Quantity sold PTD and Quantity sold YTD represent the actual quantity sold, less all returns.
|
Format |
999999999.99999- |
Used nxt prd
Qty used YTD
If you do not use either kits or Job Cost, the above fields cannot be entered.
Enter the quantity used to date in the current period and year for either a work order or on a job (as opposed to a sale).
The quantity in each field is updated when a job usage transaction (from Job Cost) or a component usage transaction is posted.
Returned nxt prd
Returned YTD
Enter the quantity of the item returned to date in the current period and year.
The quantity in each field is increased when a credit memo for returned goods is posted.
|
Format |
999999999.99999- |
Sales
Next period
Year to date
Enter the dollar amount sold period-to-date and year-to-date.
The dollar amount in each field is increased when a sale is posted, and decreased when a credit memo is posted. Sales PTD and Sales YTD represent actual sales, less all returns.
|
Format |
999,999,999.99- |
Costs
Next period
Year to date
Enter the dollar amount of costs period-to-date and year-to-date. The next period field cannot be entered. Amounts for this field will be automatically filled through posting.
The dollar amount in each field is increased when a sale is posted, and decreased when a credit memo is posted. Costs period to date, next period and year to date represent the actual cost of goods sold, less all returns.
|
Format |
999,999,999.99- |
Make any needed changes. The prior periods tab displays:
Graphical Mode

If you are not using kits or Job Cost, the Quantity-used and Qty-sold+used columns cannot be entered.
Character Mode
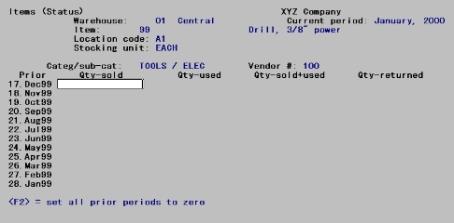
The screen appears as shown above if you are using kits and/or Job Cost. If you are not using kits or Job Cost, the Qty-used and Qty-sold+used columns do not display.
Prior periods qty sold, used, sold + used, returned
Enter a quantity in each field, except Qty-sold+used (which is calculated automatically) or press <F2> to set the quantities in all prior periods to zero.
|
Format |
999999999.99999- |
There may be up to 24 periods. If there are more than 12 periods, then you must enter the second Prior Periods tab which has the same type fields as the first Prior Periods tab, just earlier periods.
The first status screen reappears to enter another item in this warehouse.
When there are no more items associated with this warehouse, press <Esc> at the Warehouse field.
Each time you run the Close a period selection, the oldest period is removed and the period just closed becomes the newest period displayed on this screen.
If you select to enter item notes, you can enter unlimited notes for this item.
Notes are entered on a screen like this:
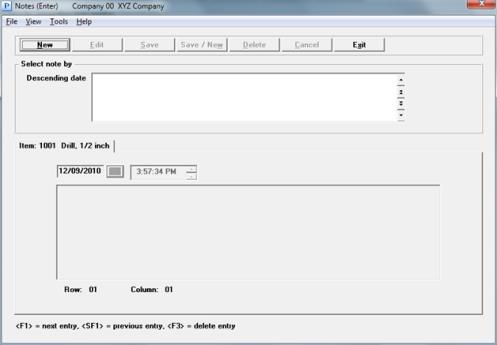
The item number and description 1 for which you are adding a note, displays as the tab name.
Select New to add a note or select Save/New to add another note if you just finished entering one. Select Edit to edit an existing note.
The cursor is positioned for you to enter the first line of the text. When typing text words the end of the line will word wrap.
|
Format |
ten lines of 77 characters each |
When adding a new note the date and time defaults to now. You may change the date and time before saving or when editing the note later.
Select Save to save the note or Cancel to not save.
Existing notes sort in the list box in descending date order.
When finished select Exit to return to the item screen.
Character Mode
A notes area of the screen displays similar to below:
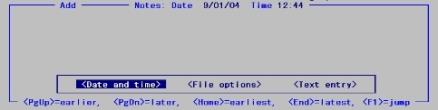
Each note is given a date/time stamp so that you can scan through the notes in time sequence later. Item notes may be viewed in I/C Items.
To scan through existing notes for an item, use the keys as shown at the bottom of the screen: <PgUp>, <PgDn>, <Home>, <End>, and <F1>.
A menu at the bottom of the Notes area shows three selections: Date and Time, File options, and Text Entry.
Date and time
Use this selection to change the date and/or time of a note.
File options
When you select File options, you have these choices:
|
File |
Save what was just entered or changed, and clear the screen for entry of the next note. (Like pressing <Enter> at Field number to change ? in other selections.) |
|
Save & |
Save what has been entered or changed, but leave the information on the screen for further work. |
|
Abandon |
Do not save what has been entered or changed and clear the screen for entry of a new note. Similar to pressing <Esc> at Field number to change ? in other selections.) |
|
Delete |
Delete this entire note and clear the screen for entry of the next note. (Like Delete in other selections.) The software will ask you to confirm the deletion with an OK to delete ? message. |
Text entry
Use this selection to enter the note text. When you select Text entry, the cursor is positioned for you to enter the first line of the text.
|
Format |
ten lines of 77 characters each |
This selection uses text editing functions. You enter text in much the same way as most word processing programs, using the <Enter>, character keys, <Delete>, etc. When you are finished entering text, press <Esc> and follow the screen instructions.
If you wish to use the more powerful text editing commands that are included in the character notes editor, see the Text Editing appendix in the System User documentation.
When you are through using notes, press <Esc>.
Up to eight substitute items that may be sold to a customer in place of the item ordered. These alternate items may be selected in O/E, or A/R as replacement items for the primary stock item.
Some of the reasons an alternate item may be useful during entry of a transaction are:
| • | the item ordered is out of stock and there are similar items available |
| • | the item being ordered is not quite what the customer wants or needs and there is another item that will fit the need |
| • | another item is more profitable but will work just as well or better for the customer |
| • | other products are available that work with the item being purchased |
Select
<F5> or click on Alternate items on the Options menu.
Graphical Mode
The following window appears:
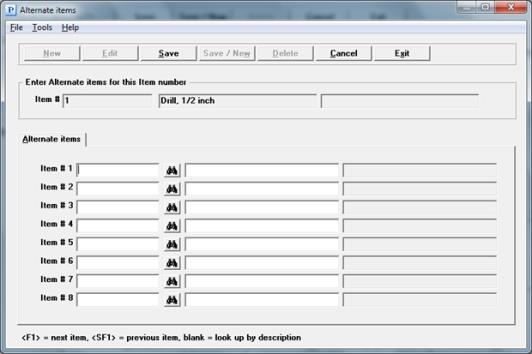
If an alternate item has never been entered the cursor is at the Item # 1 field. If there is an existing alternate item the cursor is positioned at the Edit button.
Enter
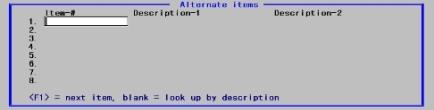
Character Mode
The following window displays:
|
Format |
15 characters |
Options
Enter item numbers for up to eight alternate items, or use one of the options:
|
<F1> |
To scan through the items in item number order when on the Item # field and in description order if on the Description 1 field. |
|
<Enter> |
To look up by description |
The item number must exist in Items or Item not in item file message will display.
Select the Save button when you have completed entering alternate items.
There are 4 items list reports.
Select
Items by item # or descr from the Reports menu.
Or from Items (Enter) select by item # or desc from the Print > Items menu selection.
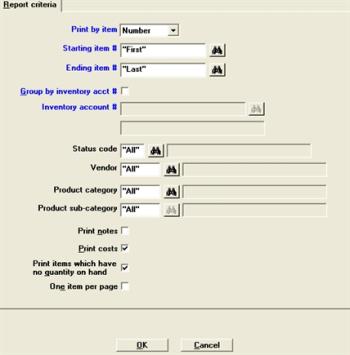
Graphical Mode
The following screen displays:
Character Mode
The following screen displays:
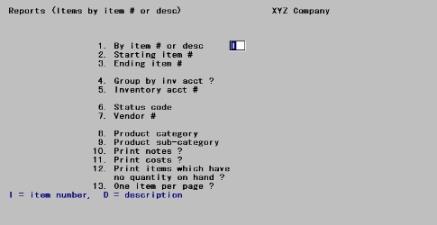
The screen for both item lists are almost identical.
Enter the information as follows:
Enter the selection to be shown on the report, by Number or by Description.
Options
Use one of the options:
|
Number |
Print in item number order |
|
Description |
Print in item description order |
Ending item #
For the Items by Item Number List, specify the range of item numbers to include.
You may press <F2> for "First" at Starting item # and "Last" at Ending item #.
|
Format |
Up to 15 characters or use the option |
|
Example |
Press <F2> at both fields |
Ending item description
Options
Enter the item description that is alphabetically lowest (first) in the range of items to be shown on the list, or press <F2> for "First" at Starting item description and "Last" at Ending item description.
|
Format |
Up to 25 characters or use the option |
|
Example |
Press <F2> at both fields |
To be included, the description must be the full description of the item, because trailing spaces are alphabetically lower than any other characters.
For example, if you intend your list to end with the item HUBCAPS, 57 MODEL, and you enter HUBCAPS, 57 MOD, the item will not be on the list because HUBCAPS, 57 MOD^^^^^ is alphabetically lower than HUBCAPS, 57 MODEL. (The ^^^^^ represents spaces).
To include miscellaneous tools as the last item on the report, for instance, it is not sufficient to merely type misc, miscellaneous, or even miscellaneous tool. You must type the item's entire description, or something like misczzzzzz. Refer to the Additional I/C Utilities appendix for an explanation of the sorting sequence of alphanumeric characters.
Check the box to print the items in order by inventory account number.
Leave the box unchecked to print them in item number order. If you leave the box unchecked, the next field cannot be entered.
|
Format |
Check box, where checked is yes and unchecked is no. The default is unchecked |
|
Example |
Press <Enter> to accept the default |
Options
Enter the inventory account for which to print the list, or use one of the options:
|
<F1> |
For 1200-000 Merchandise Accounts |
|
<F2> |
For other inventory accounts |
|
<F5> |
For All inventory accounts. |
|
Format |
Up to eight digits or use the option |
|
Example |
Press <F5> to select all inventory accounts |
Enter a valid Status Code or press <F5> for all status codes.
|
Format |
One character or use the option |
|
Example |
Press <F5> for all status codes |
Options
Enter a vendor number or press <F5> for all vendor numbers.
|
Format |
Up to six digits or use the option |
|
Example |
Press <F5> for all vendor numbers |
This is the Category you assigned while entering items earlier.
Options
Enter a product category to include only items of this category, or press <F5> for all categories.
|
Format |
Up to five digits or use the option |
|
Example |
Press <F5> for all categories |
This is the Sub-category you assigned while entering items earlier.
Options
Enter a product sub-category to include only items of this sub-category, or press <F5> for all sub-categories.
|
Format |
Up to six digits or use the option |
|
Example |
Press <F5> for all sub-categories |
Answer Y to print notes (if any) for each item on the list.
|
Format |
Check box, where checked is yes and unchecked is no. The default is unchecked |
|
Example |
Press <Enter> to accept the default |
Check this box to print costs for each item on the list.
|
Format |
Check box, where checked is yes and unchecked is no. The default is unchecked |
|
Example |
Press <Enter> to accept the default |
Print items which have no quantity on hand
Check this box to print items which have no quantity on hand.
|
Format |
Check box, where checked is yes and unchecked is no. The default is checked |
|
Example |
Select the <Space bar> to uncheck the box then press <Enter> |
Check this box to print one item per page.
|
Format |
Check box, where checked is yes and unchecked is no. The default is unchecked |
|
Example |
Press <Enter> to accept the default |
Select OK to select a printer and then print the report. Select Cancel to exit the screen without printing.
Use this selection to print a set of labels for some or all of your items.
Refer to the Item Labels chapter, for a description of creating item label formats and printing item labels.
Use this selection to remove a group of inactive items and associated status information from Items and Statuses.
An inactive item is one with no quantity on hand, quantity committed, quantity on order, quantity on back order, or quantity on work orders, and whose PTD and YTD sales figures are zero. In addition, the item cannot be a kit-item or a component item of a kit.
Refer to the Purging Inactive Items chapter, for an explanation of this selection.
If use of the optional change log was specified in Company information, you can print the Item Change Log.
Select
Item change log from the Reports menu.
You are then asked whether the Change Log should be purged.
If you answer Y, there will be no option to display the log, and the log is cleared after it is printed. If you answer N, the log may be displayed, and the information is retained.
Press <Enter> and select a printer or press <Esc> to go back to the menu without printing or purging.
Normally, when an inventory account is assigned to an item, it is not changed. If the inventory account for an item is changed, I/C will not be in agreement with General Ledger. That is, the inventory value on the Valuation Report for the inventory account will not add up to that inventory account's balance in G/L.
To keep I/C and G/L in balance, the following must be done if an item's inventory account is to be changed:
| 1. | Run a Valuation Report and get the balance for the item's old (current) inventory account. See Valuation Reports. |
| 2. | Make a G/L journal entry that credits the item's old inventory account and debits the item's new inventory account. (This assumes the item's old account has a debit balance on the Valuation Report. If it has a credit balance, then the old inventory account would be debited and the new one would be credited.) |
| 3. | Change the item's inventory account (in the Items) to the new inventory account. |
This selection may be used to copy an item to a new item number. You may also create a status for one or more warehouses for the new item.
It copies most of the item fields. Here are the exceptions:
| • | It does not copy the quantity fields. It creates all the new item quantity fields with a quantity of zero. |
| • | It does not copy the Bar code number. |
| • | The Last sold on , Last used on and Last received dates are not copied. |
| • | The system date is used for the Date created for the new item. |
| • | The Drawing number, Revision number and Revision date are not copied. |
| • | Item notes are not copied. |
| • | Alternate items are not copied. |
| • | If there are multiple units of measure, the prices and conversion factor are not copied for the alternate pricing 1 and 2. |
If you create one or more status records, it creates each status record with no information. All the fields are blank or zeros.
If you have Purchase Order, it does not create a new Vendor item.
Select
Copy items from the Utility menu.
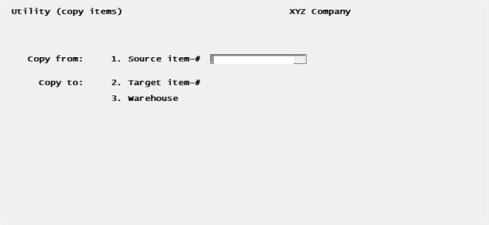
Enter the following fields:
Copy from:
1. Source item-#
Enter an item number for an existing item that you want to copy.
|
<F8> |
To use the item lookup to locate and select the item you want to copy |
Copy to:
2. Target item-#
Enter the new item number. This number must NOT be in items. If you enter a number that is in items a message displays indicating: Item is already on file.
3. Warehouse
This field cannot be entered if you have only one warehouse. A status is automatically created during the copy.
If you have more than one warehouse, enter a warehouse number to create one warehouse or use one of the options:
|
<F2> |
To bring up another screen where you may individually select each warehouse for which you want to create a status |
|
<F8> |
To use the warehouse lookup to locate and select the warehouse you want to copy |
When you select <F2> a screen similar to the following displays:
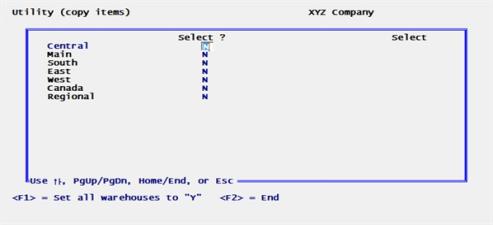
There are at least 2 columns. One is warehouse name and the other is select indicator. If you are more warehouses than will fit in these 2 columns, then another set of columns display to the right.
Enter Y for each warehouse status you want to generate or use one of the options:
|
<F1> |
To select all warehouses |
|
<F2> |
To finish selecting warehouses.
Next you are asked if you are sure and if you select Y, you are returned to the previous screen. If you select N, then you are returned to selecting warehouses. |
Field number to change?
If you select <Enter>, then you are asked "Are you sure ?" If you enter Y then the item is created with new status records. If you enter N then you are returned to the Source item-# field.
If you select the <Esc> key, then you are returned to the Source item-# field.
Select
Data import items from the Utility menu.
This selection may be used to import items directly into the items.
Data Import is licensed separately and may not be available on your system. For information on setting up and using data import see the Data Import documentation.